 Check out this cool new product that I just saw on DIY network called Snap Stone. Real porcelain tile that just snaps in place. The tile has a rubber backing, so no thinset is required. Once the tiles are in place, they are ready for grout. Visit the website at www.snapstone.com for more information.

Wednesday, December 8, 2010
Real Tile - No Thinset
Check out this cool new product that I just saw on DIY network called Snap Stone. Real porcelain tile that just snaps in place. The tile has a rubber backing, so no thinset is required. Once the tiles are in place, they are ready for grout. Visit the website at www.snapstone.com for more information.
Saturday, November 13, 2010
FOR SALE - SOLID MAPLE BASKET CREDENZA
 From the shop of Creation Cabinetry, this is a solid maple basket credenza (buffet) that I just finished constructing. The top is stained with a chestnut and walnut finish. The body is painted in a satin tuxedo black oil base. The unit measures 72" wide by 24" deep by 42" high. The center cabinet is 28" high and 36" wide with one adjustable shelf, good for storing just about anything. The wicker baskets are 13" wide by 14" deep by 11" high and are idea for storing household items or toys. The three drawers are 20" deep and have full extension slides.
Priced to sell at $2100.00.
Call 513-403-5058, or email me at ncalcara@roadrunner.com.
Tuesday, September 7, 2010
Mud Room Storage
Have you ever thought about adding a mudroom to your house? My most recent project was converting an existing laundry room into a mudroom just off of the garage entry into the house. The washer and dryer were removed from the existing space and relocated to a small second floor bedroom that was converted into a walk-in closet/laundry room.
The wood species chosen is stain grade red birch plywoods and doors and poplar hardwoods that will have a red mahogany stain applied that will give the finished product a rich and rustic look.

The room was a tight space at only six feet wide which made for a hard shot to get a photo of the new cabinetry. The cabinetry adds extra storage for small items above, three separate coat bays and shoe storage below that doubles as a sitting bench.
 Contact me to find out how to add a mudroom to your space.
Tuesday, August 17, 2010
Yard Games
 I made this cornhole set for my family last summer. Cornhole is a lawn game in which players take turns throwing cornhole bags (cotton duck bags filled with feed corn) at a raised platform with a hole in the far end. These platforms are usually made with plywood and 2x4's and are often decorated with popular sports logos. The height of the back end is 12 inches from the ground while the height of the front end can vary from 2.5 inches to 4 inches depending on thickness of the platform. The cornhole platforms are set 33 feet from the inside edge of each hole (the 6-inch diameter holes are centered 9 inches in from the top) while the player can stand anywhere from no further than the back of the platform but not any closer than the front of the platform. A corn bag in the hole scores 3 points, while one on the platform scores 1 point. Play continues until a player reaches the score of 21.
I construct my cornhole sets out of cabinet grade birch plywood and cabinet grade hardwoods (Oak, Birch, Poplar etc...) for the sides. The legs fold into the unit for easy storage and are constructed from what ever hardwood the sides are for that particular set. Being that these are custom painted and use a higher grade of materials, my sets cost more than the typical set as well. If you are interested in a set for your family or company, contact me for a free estimate.
The true history of the game is mostly unknown, though stories abound. One story claims that the game was first played during the 14th century in Germany, then rediscovered in Kentucky within the last century. Despite debate about whether the game was actually created in the Kentucky farmland, Champaign, Illinois or the West Side of Cincinnati, Ohio. Some sources credit the invention to western Cincinnati, but by whom or when is unknown.
Check out this video from Dadlabs.com on how to build your own cornhole set or go to thisoldhouse.com/team-saturday for more fun yard games and how-to videos.
Build it and let's start playing!
Thursday, August 12, 2010
Finished Basement
It seems every time we have moved into a house, finishing the basement has always been on my list of projects. The basement in our current home was no exception. This basement is huge. I think the total square footage of the entire space is about 2,300 square feet. That's more square footage than our first house was in it's entirety. I finished about 1,500 square feet and the project took me almost two years.
 This is the wet bar / kitchenette. While there is no space for a full size range or refrigerator, there is a space for a microwave, pizza oven and mini frig under the bar. Notice the arches and the how doors that were purchased from Lowes continue the theme. This is my favorite part of this basement.
 To keep costs down, I purchased pre-made cabinetry from Lowes. These cabinets are constructed of cherry stained with a warm cinnamon finish. I installed crown molding, legs and black pulls to create a traditional and rustic feeling. My wife and I did the tile backsplash together and just above the backsplash is a space for a large flat panel t.v.
 One of my favorite features of this area is the ceiling treatment. I wanted to try something different to give that old world feel, so I opted for a copper ceiling. These are PVC (plastic) panels that install easily with the correct adhesive (Note: do not use liquid nails because it does not have the quick bonding ability that you will need). I purchased wood crown molding and spray painted it a copper color to match the ceiling panels. What a difference versus a plain white ceiling!

Just to the left of the kitchen area is a hallway that leads to a bedroom, pantry closet and a full bath room. The wood flooring is actually a Brazilian cherry laminate that easy to install. The sconces provide functional accent lighting that adds to rustic feeling of the kitchen.
 To the left of the hallway is billiards area of the recreational room. This area can even be used as a dining area. The box columns add a traditional feeling to the space. The carpet is a California frize.
 The rec room continues to the rear of the lower level where glass double doors with full size side lites walk out to a beautiful paver patio that overlooks the 5th tee of Aston Oaks Golf Course.
 This area was the perfect space to add a soft tip electronic dart board.
 The rec room has a seating area where you can sit and play board games or just watch a movie on a flat panel t.v. that could be mounted over the gas fireplace.
 The full bathroom has a furniture vanity with a granite top.
 Also in the full bath is a walk in shower with beautiful travertine tile that was installed by Stephen's Tile. The tile continues on the floor and was used to create a base wrap around the length of the bathroom.
Finishing a basement provides additional living space and can add a lot of value to a home.
 This is the wet bar / kitchenette. While there is no space for a full size range or refrigerator, there is a space for a microwave, pizza oven and mini frig under the bar. Notice the arches and the how doors that were purchased from Lowes continue the theme. This is my favorite part of this basement.
 To keep costs down, I purchased pre-made cabinetry from Lowes. These cabinets are constructed of cherry stained with a warm cinnamon finish. I installed crown molding, legs and black pulls to create a traditional and rustic feeling. My wife and I did the tile backsplash together and just above the backsplash is a space for a large flat panel t.v.
 One of my favorite features of this area is the ceiling treatment. I wanted to try something different to give that old world feel, so I opted for a copper ceiling. These are PVC (plastic) panels that install easily with the correct adhesive (Note: do not use liquid nails because it does not have the quick bonding ability that you will need). I purchased wood crown molding and spray painted it a copper color to match the ceiling panels. What a difference versus a plain white ceiling!
Just to the left of the kitchen area is a hallway that leads to a bedroom, pantry closet and a full bath room. The wood flooring is actually a Brazilian cherry laminate that easy to install. The sconces provide functional accent lighting that adds to rustic feeling of the kitchen.
 To the left of the hallway is billiards area of the recreational room. This area can even be used as a dining area. The box columns add a traditional feeling to the space. The carpet is a California frize.
 The rec room continues to the rear of the lower level where glass double doors with full size side lites walk out to a beautiful paver patio that overlooks the 5th tee of Aston Oaks Golf Course.
 This area was the perfect space to add a soft tip electronic dart board.
 The rec room has a seating area where you can sit and play board games or just watch a movie on a flat panel t.v. that could be mounted over the gas fireplace.
 The full bathroom has a furniture vanity with a granite top.
 Also in the full bath is a walk in shower with beautiful travertine tile that was installed by Stephen's Tile. The tile continues on the floor and was used to create a base wrap around the length of the bathroom.
Finishing a basement provides additional living space and can add a lot of value to a home.
Wednesday, July 14, 2010
Make Your Bed!
Making a bed can be a simple project, and if well planned, it can be done over a weekend. Not to mention the money you can save compared to actually purchasing one. I made this picket fence bed for my daughter about six years ago and she still sleeps on it today. I looked through several magazines to get some ideas on how I wanted to construct it (actually, my wife gave me a picture of one and said, "can you make this?"). If I remember correctly, most novelty stores wanted somewhere around $600 for similar items. I spent about $200 for the wood and paint, and constructed it in one weekend.

 The bed posts are actually just newel posts (for stair railing) that I purchased as a shelf item from Lowes, and the pickets are just 1x popular. I laid everything out on my workbench, spreading the pickets with 3/4 inch spacers. Then I drew an arch on the spaced pickets and cut the tops off with my jigsaw. The pickets were all glued and screwed on to a top and bottom brace and the brace was mortised into the newels. The bed rails were also mortised into the newels as well as anchored with some angle brackets.
Here is a bed that I made for a client who wanted a Pottery Barn Bed but wanted it to be customized to meet her needs. The beds have the same storage underneath as the Pottery Barn Bed, but the head board/box was customized to serve as a toy storage box. The top has two lids that open at both heads and the lids are supported with piano hinges so that slamming does not occur. The mattresses rest on a full sheet of 3/4" plywood. This deletes the need for a box spring and allows for a lot of accessible storage underneath. This bed took a little longer than a weekend to construct, but was still easy enough for a novice woodworker to build.
 So, if your looking for an easy and fun project to do this weekend, why don't you start by making your bed.
Tuesday, July 13, 2010
Boxes
In simplest terms, cabinetry is just boxes with decorative facing, trim and doors. Once you determine the space that you would like place the cabinetry and the feel desired for the room, the rest is just being creative and building what you are envisioning.

 Here are some simple book cases constructed of oak veneers and solid oak facing. The client wanted the book cases to be connected by an oak mantel and valance. The upper book cases were 30" wide by 16" deep, and the lower base cabinets were 30" wide by 18" deep. The plan was to install glass paneled doors on the upper book cases and solid raised panel doors on the base cabinets. The cabinets were not completed though, because the client could not make up her mind and ran out of money for the project.
 Here is another example of some simple box framed cabinetry. I built these for my friend to install in his uncles house. Constructed of birch veneers and paint grade popular, these cabinets were easy to make and look great painted white. My friend crafted the mantel and painted it white to match the cabinets, which adds some much needed contrast to the brick hearth and surround.
 This last example of box cabinetry was a project I did for my son's room in our last house. This book case is constructed of maple veneers and solid maple facing. I even made the maple crown and base molding myself. The doors were crafted from a company called Walzcraft, which I would highly recommend if you are looking for any cabinetry accents. The space that the cabinets were installed in was only 14" deep, so I kept them slim and simple just to add some much needed decorative storage to the room.
So, build some boxes and get creative with the rest. The final results will be something you can be proud of.

 Here are some simple book cases constructed of oak veneers and solid oak facing. The client wanted the book cases to be connected by an oak mantel and valance. The upper book cases were 30" wide by 16" deep, and the lower base cabinets were 30" wide by 18" deep. The plan was to install glass paneled doors on the upper book cases and solid raised panel doors on the base cabinets. The cabinets were not completed though, because the client could not make up her mind and ran out of money for the project.
 Here is another example of some simple box framed cabinetry. I built these for my friend to install in his uncles house. Constructed of birch veneers and paint grade popular, these cabinets were easy to make and look great painted white. My friend crafted the mantel and painted it white to match the cabinets, which adds some much needed contrast to the brick hearth and surround.
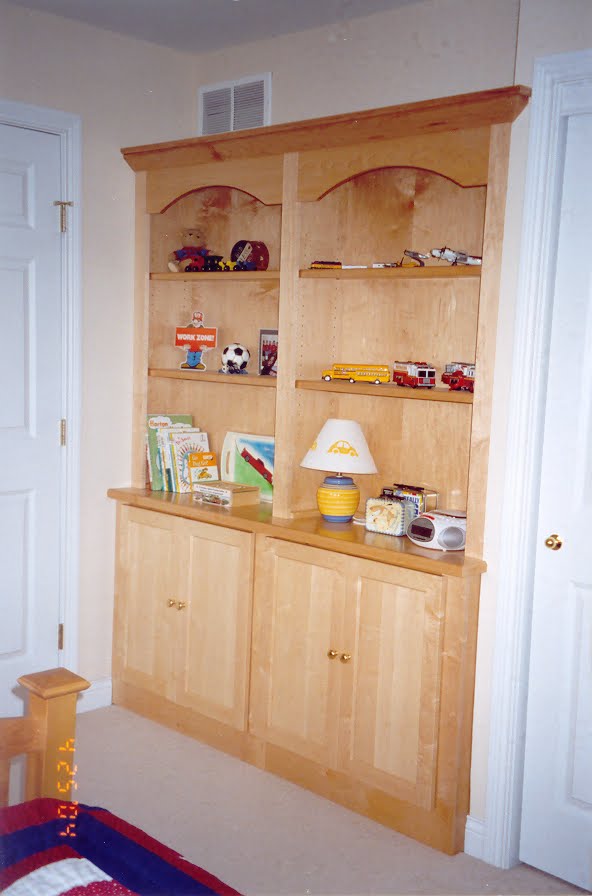 This last example of box cabinetry was a project I did for my son's room in our last house. This book case is constructed of maple veneers and solid maple facing. I even made the maple crown and base molding myself. The doors were crafted from a company called Walzcraft, which I would highly recommend if you are looking for any cabinetry accents. The space that the cabinets were installed in was only 14" deep, so I kept them slim and simple just to add some much needed decorative storage to the room.
So, build some boxes and get creative with the rest. The final results will be something you can be proud of.
First Project
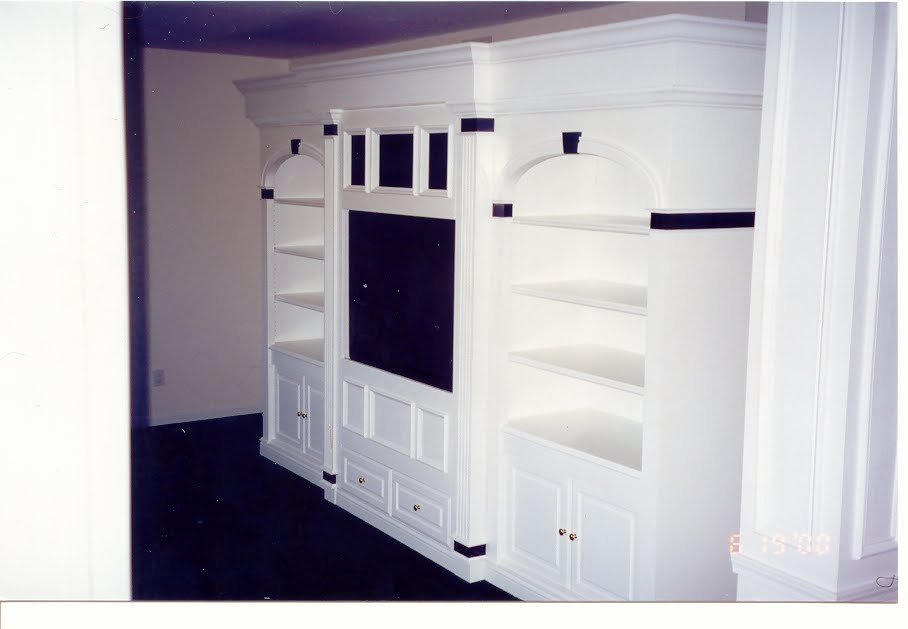
This was my first project when I had just started my new job with Timber Valley. The company does not exist anymore, but the cabinetry still does, as I have seen it in pictures from when the house had been re-listed on the market twice in the past ten years.The entertainment unit was massive and heavy. It was completely constructed of MDF (medium-density fiberboard) with some solid wood bracing and moldings. It was built in five separate units then disassembled, painted and shipped to it's location in the Mason area. The five units consisted of a base platform, two book-cases, a center audio unit that concealed a projector style floor unit large screen television, and a crown box that rests on the entire span of the unit to bring it all together.This project took me the better part of a month to complete, as I had no formal training prior to building it. I thoroughly enjoyed building this unit and hope that who ever lives in the home where it is, enjoys it as well.

 Stay tuned for more of my creations as I finally get this blog up and running.
Get out there and Build It!

 Stay tuned for more of my creations as I finally get this blog up and running.
Get out there and Build It!
Friday, February 5, 2010
Double Mantel


This is a double mantel that I just finished. The existing mantle is constructed of builder's grade popular. I used hard maple and painted all of the new components with a white lacquer paint.
I removed the existing capitals and plinths to make way for the new full length fluted pilasters with new plinths. Then I installed the new frieze board with a beautiful 6"x32" maple scroll that is 1" deep in some areas. It really stands out.
Once all of the rework was finished with the base mantel, I then installed the completely new upper mantel. The new 8 foot tall fluted pilasters are anchored to the walls with drywall anchors and finish nails. The new arched frieze board with scroll was screwed and liquid nailed to the wall next. I pre-made the crown molding cap so that all I would have to do was anchor a backer board to the wall, and then nail the crown piece to the backer board. This eliminated having to make difficult crown moulding cuts 12 feet in the air. Once the crown was in place, I simply put a 3/4" plywood cap with an edge moulding wrap.
Some white nail filler and some paintable caulk, and the job was complete. I even hung the decorative steel pieces to finish off the look.
Subscribe to:
Posts (Atom)